Alexandra J. Forsythe
Keep in touch!
  • Home
  • About
  • Work
  • Volunteerism

Raytheon

5/20/2016

0 Comments

 
I recently had an externship/job shadow at Raytheon. It was a wonderful and informative opportunity that I hope to be able to repeat in the future.

Raytheon is working on several fascinating projects, and I enjoyed learning more about them. I also met so many brilliant people during my time there. Scott Plant, senior engineering manager, was the organizer. He and I serve together on the Sci-Fi Central planning committee, so I already knew from working with him at Science Central that he is quite imaginative and he is passionate about his work. He informed me about the company itself and what they do. He also gave me a tour of the building and showed me the incredible "Innovation Lab": a lab specifically for the employees to use to create their own projects which they can then market to the company.

Ms. Kathie Irk, systems engineer, discussed some of the declassified advanced technology that Raytheon makes to help plan missions and provide alternatives to operators. She also showed me one of the radio labs and explained how the radios are used by our military. 

Next, Mr. Michael Conrad and I shared our electronic design experiences. We discussed circuit board design and fabrication, and he took me on a tour of another lab, this one with processors and testing equipment. Mr. Conrad showed me one of the circuits that Raytheon is reverse engineering to help make the products safer, as well.

Mr. Julian Ross, hardware engineer, spoke with me about firmware: how it works, what it does, and how he became a firmware engineer. He also walked me through the process of making one of Raytheon's incredible projects come to fruition. 

Another hardware engineer, Mr. Eric Harmison, showed me how radios transmit signals and what it looks like when they are transmitting. He showed me how they look by using an analyzer and a signal generator, which precisely displayed the variations in signals.

Mr. Greg Carnes, systems engineer, evaluated the various specialties that an electrical engineer can have and what each entails. He then went on to discuss the benefits of each specialty and gave me examples of how each is used.

Last, I spoke with two software engineers: Mr. Nathan Schroer and Ms. Brenda Richardson. They took me on a tour of a classified lab and showed me an excellent example of how quickly technologies can change. The testing and experimentation equipment in the lab used to take up an entire wall or more, but with the technological advances, the equipment takes up just a few racks. They also informed me of possible opportunities at Raytheon for future consideration.

I had a fantastic time, I learned a lot, and I am hopeful that I can someday secure an internship with Raytheon so that I can delve deeper into their amazing technologies and products!
0 Comments

R2 Wiring

5/15/2016

0 Comments

 
Once the control board was assembled, I had to wire all of the components together. The first thing I had to do was drill the holes to allow the wires to go through the board. Plexiglas, which is what my board is made of, is very delicate and needed to be handled with precision and care. I started the holes with a 1/8” bit and worked up from there, using 5 bits to ensure that my board would not break.
 
After the holes were drilled, I began the wiring. The first things to wire were, of course, power and ground. I ran the wires through special holders on the back of the board that let you easily zip tie the wires close together and allow your board to be more organized. Then I brought them up through the holes, which were positioned directly in front of the boards they were to go into, and put them in the screw terminals that I added to the boards to let me connect the boards with ease.
 
When the wires were in place, I tested them to be certain that I had not accidentally swapped any of the wires with each other. If I had, it could ruin the board that they were connected to. Fortunately, all of the wires were in their place and R2 was ready to go!

0 Comments

PS2 Adruino Shield

5/8/2016

0 Comments

 
To make an R2 move, most builders use a PS2 controller with several control boards.  The controller operates the foot drives and dome motor. Recently, the manufacturer of one of those boards retired, leaving no viable replacements.
 
So, to control my R2, I created an Arduino shield that hooks up to a PS2 controller. After testing my concept by hacking a normal PS2 receptor and wiring it directly to the Arduino, which leaves several extra wires exposed and requires a very delicate touch to adjust, I began building my board.
 
The first step was to find the exact positioning of the Arduino’s headers and to space the board’s connectors out accordingly. Once I knew how much space I had to work with, I began designing the schematic and adding the components with the proper footprints for each. Then, once I had finished the schematic, I began the board layout. I had to place the connectors first, then the receiver and terminal blocks, then the resistors and LED. After I had them placed, I created the ground plane and the 3.3V power plane and routed the board.
 
With the board finished, I sent it out for fabrication and, less than a month later, I had the board! I then applied the components to the board and tested it, and it works!

0 Comments

R2 Can Move!

5/2/2016

0 Comments

 
Picture
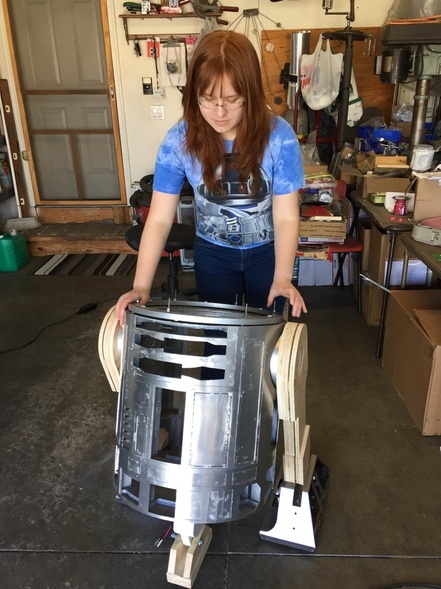
This past weekend, I finally got my R2-D2 up and running! I can now use a remote controller to make him move around instead of having to push him or carry him from place to place. 

In order to get him running, I had to get a temporary front foot, cut the front leg down to the correct size and secure it, and complete all of the wiring. The temporary foot is sized to scale with the actual foot and has two wheels on the bottom to allow it to move. It is made entirely of wood, except for the wheels and the screws holding them in place, and is wonderfully simple.

The front leg was originally 6" too long, and needed to be cut down to size. The cut had to be perfectly straight to allow R2 to move properly. Once the leg was cut, it had to be centered on the base of the frame. Because the base is partially circular and not precisely even on all sides, it took many measurements and critical eyeballing to ensure everything was lined up. Once it was lined up, I countersank the screws to allow the battery a flat surface.

Most of the wiring had been laid out by then, as I've been working on it on and off for the past few weeks. All that I had to do was actually connect everything and attach an Arduino and the motor driver. Then it was ready to go! 
0 Comments

    Author

    Alexandra Forsythe

    Archives

    November 2022
    October 2022
    July 2022
    June 2022
    April 2022
    February 2022
    November 2021
    September 2021
    June 2021
    March 2021
    February 2021
    January 2021
    December 2020
    November 2020
    October 2020
    August 2020
    March 2020
    September 2019
    August 2019
    June 2019
    April 2019
    March 2019
    February 2019
    October 2018
    September 2018
    August 2018
    July 2018
    June 2018
    April 2018
    March 2018
    November 2017
    August 2017
    July 2017
    May 2017
    April 2017
    March 2017
    January 2017
    December 2016
    November 2016
    October 2016
    September 2016
    August 2016
    July 2016
    June 2016
    May 2016
    April 2016
    March 2016
    February 2016
    January 2016
    December 2015

    Categories

    All

    RSS Feed

Powered by Create your own unique website with customizable templates.