To allow me to use an Arduino with a 12-volt battery, I needed to get a converter to 6 volts. Instead of buying one, I thought this was the perfect opportunity to design my own board!
To begin with the design, I looked up the datasheet of my Buck Regulator and examined the suggested layout and how to select the other parts. Then I began the schematic.
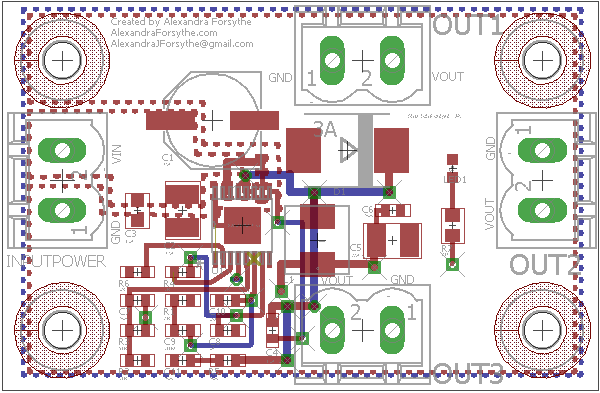
The schematic tool I use is Eagle CAD. To begin, I found all of the parts I had selected with the correct footprints. It took a surprising amount of work to get just the right footprint! Then I connected the components and began the board layout. I first squeezed all of the pieces in as tight as I dared and put everything as close to the parts they connected to as possible. Then I created a ground plane, a 12V plane, and a 6V plane to cut down on the number of traces. I also decided to have 3 outputs so that I could connect multiple loads to a single board. Then I connected everything through traces and vias and voila! The board layout was complete!
Next I had to send the board in for fabrication and I had a solder stencil created. It took 2 weeks for the board to arrive and a few more days for the parts to come in. Once everything was at my house, I began the assembly!
To assemble the board, I first had to clean it with isopropyl alcohol and make sure the stencil matched the copper. Once I was certain everything was in place, I created a jig for the board so the stencil would lay flat on it and the solder paste would be even. Then I put the solder paste on by squeezing it onto the exposed copper areas and then using a card to spread it evenly. Once the solder was on, I placed the components on the board with tweezers and lined all of them up as best I could. Most of the resistors and capacitors had 0402 footprints which is just 1mm in length! When I had finished placing the components I put it in a toaster oven at 450 degrees and let it sit for about 2 minutes. After taking it out and letting it cool, I put the connectors on the board and tested it. It worked!!
To begin with the design, I looked up the datasheet of my Buck Regulator and examined the suggested layout and how to select the other parts. Then I began the schematic.
The schematic tool I use is Eagle CAD. To begin, I found all of the parts I had selected with the correct footprints. It took a surprising amount of work to get just the right footprint! Then I connected the components and began the board layout. I first squeezed all of the pieces in as tight as I dared and put everything as close to the parts they connected to as possible. Then I created a ground plane, a 12V plane, and a 6V plane to cut down on the number of traces. I also decided to have 3 outputs so that I could connect multiple loads to a single board. Then I connected everything through traces and vias and voila! The board layout was complete!
Next I had to send the board in for fabrication and I had a solder stencil created. It took 2 weeks for the board to arrive and a few more days for the parts to come in. Once everything was at my house, I began the assembly!
To assemble the board, I first had to clean it with isopropyl alcohol and make sure the stencil matched the copper. Once I was certain everything was in place, I created a jig for the board so the stencil would lay flat on it and the solder paste would be even. Then I put the solder paste on by squeezing it onto the exposed copper areas and then using a card to spread it evenly. Once the solder was on, I placed the components on the board with tweezers and lined all of them up as best I could. Most of the resistors and capacitors had 0402 footprints which is just 1mm in length! When I had finished placing the components I put it in a toaster oven at 450 degrees and let it sit for about 2 minutes. After taking it out and letting it cool, I put the connectors on the board and tested it. It worked!!
 RSS Feed